Advanced Component Development
The Nestor platform has many built in functions that you can use in your Component development. This section covers the following:
Form Submission
In order for your Component to take full advantage of the security and flow continuity provided by the Nestor framework, form submissions need to be routed properly. Nestor has a specific procedure that must be followed to eliminate common form submission security vulnerabilities. Once you understand the form submission procedure, you will be able to take full advantage of it to interact with your end users.
Form Submission Process
If you’d like to collect and process user data with your component, there are a few pieces that need to be in place. Many of these are provided by the Nestor framework by default, but you will need to manage some of them in your code. Follow these steps to submit and process form data:
- Any form with the class "asynchronous-form" will invoke the submit function in vce.js, and the form will be submitted asynchronously
- The form is submitted to the path designated by $vce->input_path. By default this is [my_site_url]/input
- Form input is routed to input/input.php, which decrypts the dossier and sanitizes and re-keys all dossier and form field values into an input array
- Input Class checks if there is a form_input method in specified class, if not it calls form_input in Component class
- Form_input routes the input array to the designated procedure – which is the class/method in the dossier
- Procedure processes the data passed in the dossier and form fields
- Control passed back to originating javascript call, which displays any messages echoed by PHP methods
Generate a Dossier and Configure Form Fields
Your component needs to create the HTML content for the form fields, which must include values for the following:
- A hidden input that contains an encrypted dossier. A dossier is
basically an array of values that designate the component type, the
procedure that is called in the component when the form is submitted, the
component_id and the “created_at” value. Other values can be added based on
your component’s needs. The encrypted dossier is generated by calling
$vce->generate_dossier($dossier).
Depending on what point in the page build process you are calling this method, the component may already have dossiers available for create, update and delete. If these suit your needs you can use them without having to generate a new dossier. But sometimes it’s just safer to go ahead and create the dossier before you use it. - A hidden input that contains the site input path, designated by $vce->input_path
- Your form fields from which you’ll collect user data
Example
The Blog-o-rama example has a create_contact_form method that shows how to generate a dossier and populate form fields with hidden values.
|
public function create_contact_form($each_component, $vce) { $dossier = array( 'type' => 'Blogorama', 'procedure' => 'update_contact', 'component_id' => $each_component->component_id, 'created_at' => $each_component->created_at ); // generate dossier $each_component->dossier_for_contact = $vce->generate_dossier($dossier); $contact_form = <<<EOF <div id="text-block-container add-container"> <div class="clickbar-container"> <div class="clickbar-content"> <form id="create_media" class="asynchronous-form" method="post" action="$vce->input_path" autocomplete="off"> <input type="hidden" name="dossier" value="$each_component->dossier_for_contact"> <input type="hidden" name="title" value="Contact Info"> <label> <input type="text" name="contact_email"> <div class="label-text"> <div class="label-message">Email</div> <div class="label-error">Enter an email</div> </div> </label> <input type="hidden" name="sequence" value="$each_component->sequence"> <input type="submit" value="Sign Up"> </form> </div> <div class="clickbar-title clickbar-closed"><span>Contact Form</span></div> </div> </div> EOF; return $contact_form; } |
The create_contact_form method is called from as_content in the Blogorama class to allow the form content to be written to the rendered page.
|
public function as_content($each_component, $vce) { //$my_content = $this->component_info(); $display_content = "Blog-o-rama says hello!"; $display_content .= $this->create_contact_form($each_component, $vce); $vce->content->add('main', $display_content); } |
Processing Data from your Component
The simplest way to receive data is to use the inherent update function in the Component class. In this case you’d use a procedure value of ‘update’ in the dossier. By default, the ‘update’ procedure will update any existing metadata, or add metadata with keys that do not currently exist in the components_meta table for the designated component.
If you want to perform anything more complex, you’ll need to write a method that matches the name of the procedure you used in your dossier. This method can process your data using many of the Nestor features, such as creating/updating datalists, updating component metadata, or simply changing the display.
In the Blogorama example, the update_contact method is the designated procedure in the dossier. In this case the method calls to the $vce->dump method which simply echos the contents of the array to the page.
The echo command returns a message to the originating js call, which will be displayed on your page once the server is finished processing data.
Example
|
public function update_contact($input) { global $vce; $vce->dump($input); echo json_encode(array('response' => 'success', 'procedure' => 'create','action' => 'reload', 'message' => 'This is only a test')); return; } |
Ways to Subvert the Form Submission Process
- Overwrite the form_input method from the parent Component class. Be careful if you do this, and make sure to keep the important elements that allow your input to be processed
- Write a custom method to process your data, and make sure it’s the designated procedure in your dossier
- Customize your form fields that you add to a page. You can have multiple forms with multiple dossiers
- Overwrite the input path and create your own component to route the data.
File Upload
There are some components which allow a user to upload a file. This can be useful in many scenarios. There are two methods involved in building and adding the file upload element to a page:
- File_upload returns true or false. The file upload element will only be added if this method returns true. Use this method to test conditions to determine if the element should be added to the page.
- Add_file_uploader will create the HTML content to add a file upload element to the page, and returns this content.
The Blogorama Class has a working example using the file_upload and add_file_uploader methods to add a file upload element to the page.
Add a Hook
Hooks are a powerful tool that allow your component to hook into the Nestor engine at various stages of the page build process, as well as any place in the code where a hook has been inserted. A hook is configured within a component class and designates a class and method to call when the hook is invoked within the system. In the Nestor system, a class/method pairing is known as a procedure.
Read the Hooks section for detailed information about what hooks are available in the Nestor system and how they can influence the function of the core engine classes.
Hook configuration
During the Page Build process, the procedure/hook associations are loaded into a hooks array that’s added to the global $site object. The Hooks Definition and Load Process flow chart shows the end-to-end process of defining a hook and loading into the system for use.
Hook configuration example
To assign a procedure to a hook, overwrite the preload_component method in your component. Add all of the hooks that will use methods in your component to the $content_hook array. For each hook, use the hook name as the array index, and assign the component method to call when the hook is invoked.
|
public function preload_component() { $content_hook = array ( 'page_requested_url' => 'File::page_requested_url', 'site_media_link' => 'File::site_media_link' ); return $content_hook; } |
You can also control the order in which hook events are fired off by using a priority value. A lower or negative priority value goes first, with positive numbers after. In this case, each hook's properties will be added as an array.
|
public function preload_component() { $content_hook = array ( 'page_requested_url' => ['function' => 'File::page_requested_url', 'priority' => -100], 'site_media_link' => ['function' => 'File::site_media_link', 'priority' => 100], ); return $content_hook; } |
Build a Component with Minions
There are some cases where you may want to create a component that will have a number of sub-components, referred to as Minions, that it can interact with in a standardized manner. The Media/MediaType Components are an example of this relationship.
You can add a Media component to a recipe, and then in the recipe you can designate which of its Minions will be available for end users to add to their page. Minion components must be installed and activated before they will appear as an option in the Media component configuration in a Recipe. In the figure below, you can see the Image, Text, and PDF Minions appear in the Media component configuration.
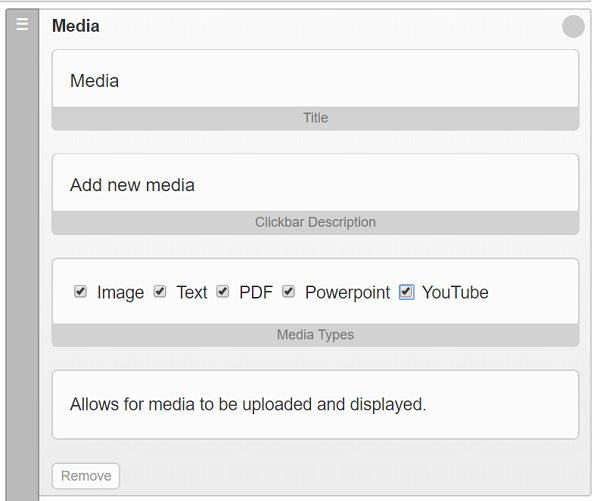
Media component in a recipe with Minion selection
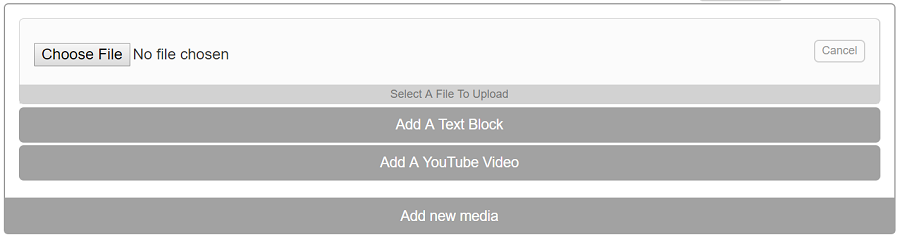
Media content choices for the end user, all Minion types represented
Master/Minion Class Structure
The master class (Media) extends Component class, while the Minion component classes extend a Minion parent class that you will need to create. In the case of the Media parent component, it’s Minions all extend Class MediaType. Each of these classes must contain methods to perform certain operations to make sure the Minions are properly associated with their Master component.
Master Component Class
The Master Class needs to perform the following operations to find and connect to its Minions.
- Create a hook in the preload_component method
- Use the hook to call a method that loads in the Minion Parent class (ie MediaType)
- In the as_content method, load in the list of minions. This list takes the form of an array that’s a property of $site, labeled enabled_[Minion parent class name]s. ( ie enabled_mediatypes)
- The enabled_[Minion parent class name]s array is created and populated by the Manage Components page each time the Master component is added or updated. It’s populated with all of its active Minions. It will be given the name enabled_[Minion parent class name]s by default.
- Cycle through the Minion array and load each of their class files
- Call a method in the Media class, ie edit_media_component, to generate dossiers and to call the edit function of each Minion
- In the add_component function, add code to make sure each minion shows up as a checkbox
- Create a subfolder under the master folder for the Minion parent class files
Minion Classes
- Create a separate folder in the [my_nestor]-content/components folder to host each minion, create a class file for each Minion in its respective folder
- The parent Minion class should have a generic methods for display that each Minion will overwrite
- The parent Minion class needs a method to add each Minion, using dossiers created by the master class
- The Minion classes will need to flesh out the display method to generate content for themselves